
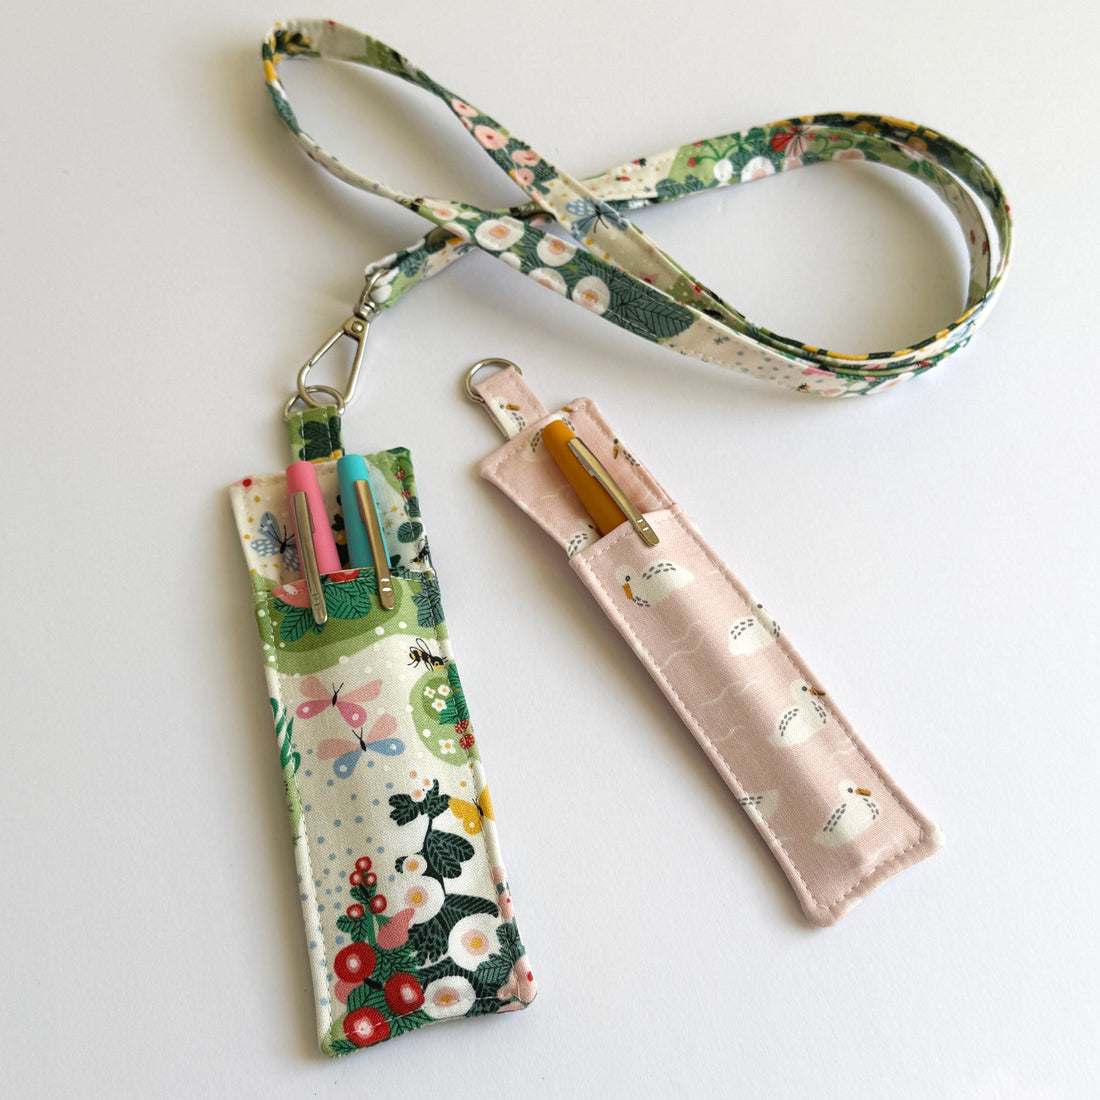
Sew a Quick & Easy Pen Holder Lanyard
Is it just me or are we all losing pens? That’s why this Pen Holder Lanyard is such a game-changer! No more rummaging through pockets, bags, or desks, just put it on and your pen is always right where you need it.
This beginner-friendly sewing pattern is a quick and easy scrap-busting project, making it perfect for both personal use and handmade gifts. With just a fat quarter of fabric, a D-ring, and a swivel clip, you can create a stylish and functional pen holder that clips onto your lanyard, badge reel, or keychain.
Why You’ll Love This Project
- Beginner-Friendly – Simple stitches and easy construction
- Quick to Sew – Finish in under 30 minutes!
- Scrap-Friendly – Use fabric from your stash
- Great for Gifts & Craft Fairs – Practical and stylish
Materials You’ll Need
Pattern Pieces - Download for free.
Full PDF pattern available in the Tutorial to PDF Bundle
Fabric: 1 Fat Quarter of quilting cotton
Interfacing: 1 Fat Quarter of fusible interfacing (SF101)
Notions:
- (1) ½” (12mm) D-Ring
- (1) ½” (12mm) Swivel Clip
Simple Instructions:
• Cut out your fabric and interfacing pieces. Cut your Lanyard to your desired length with the width being 2".
• Fuse interfacing to the back, pocket, and lanyard pieces.
• Fold the lanyard strip in half lengthwise, then fold the edges to the centre, press, and stitch down both sides.
• Thread the swivel clip onto the lanyard, fold it in half, and stitch the ends together.

- For the D-ring tab, fold and stitch it in the same way, then thread on the D-ring and baste it closed.
- Sew the pocket pieces together along one short edge, turn right side out, and topstitch.
- Align the pocket with the back piece and baste it in place.
- Place the D-ring tab at the centre top of the back piece.

- Place the second back piece on top (right sides together) and stitch around, leaving a small opening.
- Clip the corners, turn right side out, and press.
- Topstitch around the edges to finish.
- Clip the lanyard to the D-ring, insert your pen, and you’re done! 🎉


2 comments
Yes,please show a video of this project . Thank you
Would like to see a video of this project.